Saturday, March 27, 2010

Raised-Bed Vegetable Garden, the Easier Way

There are a million schemes for raised-bed gardens, and if you are going to put yours on an unleveled spot, it can be tricky.  Pioneer Woman's is a good plan, but takes a lot of leveling of dirt.  That's hard!  And Hard Work!  My garden bed plan was based on one I helped build for St. Clement's School, and the 4th graders grow some beautiful flowers and vegetables, and have learned so much about gardening.  What you do is make a real....bed.  With legs.  you can level it easily by digging under the legs, not necessary to level the entire ground under it.
This plan  is easy and only took myself and Cerebro Izquierdo 2 hours to put together, but that was using some power tools, a saw and a drill, to be specific.  Here are some of the hand tools you will need.
I decided to use 2x12x10ft. boards.  They were about $8 apiece.  I also bought a 4x4 inch post which was also around $8.00.  The Square Foot Gardener says that you only need to use 6 inches of soil, so you could use 1x6's.  Also, using 10x10 is going to cost me about $100 to have filled with a soil compost mix from a local materials outfit.  You figure 27 square feet in a square yard of soil, and since I don't want to fill it to the top, and I'm going to amend the soil some, I need 2 yards.  All together this garden is going to cost me around $200.00.  However, it will be moveable if I need to, and it's very large. That's a ton of vegetables, and over the years....what's that word?  Amortize?

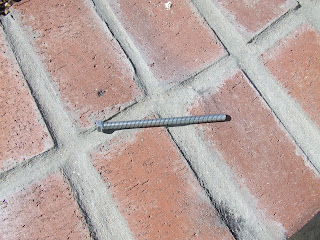
You will need 16 bolts, like this, 3/8x6,
and washers and nuts to tighten them up.
I realized that if I set the boards up on the posts with some space underneath like a real bed, we could easily dig holes under the posts to get the top level, which is what we did.  We cut the 4x4in. posts to 18 inch lengths, giving ourselves a 6 inch leg to use when leveling. If your space is not as sloped as mine was, you could leave less space on the "legs".
I made two templates with drill marks spaced so the bolts wouldn't hit each other.
We marked the posts with the templates like this, and then used the drill to make a 3/8 (the same size as the bolt) hole through the post.
We then set up the boards and posts on the ground and held the boards to the posts and used the drill to mark where to drill on the board.  Then we drilled holes in the boards and used the bolts to connect the pieces.  Voila!!  Then we used the level to check which sides were uneven and dug underneath the high posts until the level was happy.

I decided I didn't need the bottom of the boards to touch the ground, and I'm using some left over vinyl flooring that I used for the chicken coop to close the larger openings, but I'm not sure I even needed it.
Now for the dirt, the peat moss, and the vermiculite. Hmmmm.  Seeds or plants?

Monday, March 22, 2010

My Arctic Air Glass Door Refrigerator

I am posting this because when I was thinking about buying an Arctic Air restaurant glass-front refrigerator for our home, I could only find 1 opinion about it, and that was, I believe, on epinions.  That person loved it.
So, I am posting this after owing and using this for a year and a half, and I am saying, "I love it."
However, you have to have another freezer to keep ice or an ice maker or some scheme like that.   Because of course, this fridge won't freeze anything or make ice.  It doesn't have the shelves on the door for condiments.  And that's OK.  There's plenty of room in here for condiments.  I keep my veggies in one box and my cheese in another and my meat(ish) stuff in another and my condiments and tortillas in another.  The top shelf holds a ton of milk, drinks, yogurt, cream and sour cream.  
Having a glass door isn't everyone's dish of fish.  And I did, admittedly, spend quite a bit of time finding just the right plastic boxes for keeping things organized on the shelves.  I finally bought a plastic thingy with drawers at Walmart, keeping the drawers and ditching the plastic drawer holder.
But, here is the thing.  It's alive.  It's light.  It has a pleasant hum.  It's food.  I can see what's in it and know when I need to pick up some milk.  It's not boring.  I can keep tons of food in here, much more than any other fridge I've ever owned.  And it's the easiest-to-clean refrigerator I ever cleaned. I bought it from an internet restaurant supply, no tax and free shipping.  My own epinion is: A+.

Friday, March 19, 2010

Mazatlan Sourdough Bread, Part 2

This is my waaay-easy, almost knead-less bread recipe.  It only involves using the starter 7 hours before you make the bread.  So sometime in the morning, put 2 ladlesful of flour
  in a big bowl.  I just used AP flour from Ley.   Add two ladles of sourdough starter to the flour in the bowl and one ladle of water, more if your dough is too dry, also 2tsp. of salt.  (Remember to add two ladles of flour and 3 of water to the starter and stir well, then put that away.)
Stir up your flour, starter and water, just until well mixed, and cover it with plastic or a towel and let it sit in a warm place.  It needs to double in size and that could take as little as 2 or three hours, depending on how active your starter is.  You'll just have to check.  If you want to leave it until the next day, you ought to put it in the fridge so you don't wear out your yeast.  I usually leave it until 2 hours before dinner, so it's just cooked but not hot when it's time to eat.
At this point take it out of the bowl and turn it onto a floured surface.  Knead it for a couple of minutes, adding more flour if it's really sticky, until it makes a pretty ball like this.  You can leave it in the dutch oven to rise a while, but I found I didn't have to with the starter I used.
Put the ball of flour in a heavy dutch oven with the lid on, and put it into a cold oven.  Set the oven to bake at 400F and let it bake for an hour.   Take the lid off and let it cook about 15 minutes more.  Then, it's done.
Wrap it in a towel when you take it out of the dutch oven. Serve with lots of good butter and wine, or course.  Don't you just feel like an earth mama now?  Try and not break into "I am Woman".  But I know you'll feel like it.


So, to recap:
1. Two large ladles full of starter in a bowl.
2. Two ladles  of  flour.
3. Three ladles of water.
4. 2 tsp. salt.
5. Mix well, cover, and leave in a not-cold spot.
6. When doubled, knead with enough flour to make into a ball.
7. Put the ball into a dutch oven and cover. You can let it rise a while in the dutch oven or,
8. Put the dutch oven into the oven and set to bake at 400.  
9. Leave in for 1 hour, then uncover for 15 more minutes.
10.  Try (it's hard, I know) to let it cool down before eating.

Mazatlan Sourdough Starter

I love to bake bread.  And sourdough, made with wild yeast?  It's so ... miraculous.  And easy.   Just look what you can do with air, flour, and water!

What is wild yeast?  It's yeast that is floating around in the air, everywhere.  Maybe not so much in the dry Mojave, but tons around the ocean or humid places.  The day I caught my little yeastie pals in Mazatlan was sunny and breezy.  All you do is mix an amount of pure water and flour, 1.5 to 1, and go outside and stir, stir, stir.  Leave it outside for a while and then stir some more.  Put it in a clean jar and don't screw the lid down all the way, because the little yeast organisms digest and produce co2 which will need to escape.  But you'll need to nourish and grow your little colony of yeast.  So, after your initial "catch" has sat in room temperature anywhere between 8 and 12 hours, take half of it and throw it away, Yes, it seems a waste, but until you have a good batch you have to do it. Then, you need to feed the remaining "batter" with more pure water and flour, in 1.5 to 1 proportion.  Stir, stir, stir again, because yeast likes oxygen.  Think of the remaining yeast organisms getting stronger and healthier, and reproducing at a faster rate.    Do this 3 or 4 times and you'll have a lovely little Yeast farm in your jar.  It should smell pleasantly tangy,  sour and ... yeasty, and a little liquid will form on the top, this is "liquor" and it is alcohol.  You can either stir it back in or let it drain off.  I think the flavor doesn't improve the sourdough batter and when I make bread, I use a lot of starter, so I pour it out.
So, to recap:
1. Put flour and purified water in a bowl on a breezy day.  About 2 to 1 water to flour. Stir well.
2. Set outside for a couple of hours.
3. Stir again and put in a clean jar or container.
4.  8 to 12 hours later, take out half, and put more flour and water in.  Stir well. Cover with a loose lid and let it sit out unrefrigerated.
5. Do it again.
6. Do it again.
7. Do it again.
8. Add 2c. flour and 3c. water the last time.  When it's bubbly, either use it or put it in the fridge until you do.
9.  Always add flour and water every time you use some.  It can go right into the refrigerator afterwards.

Thursday, March 4, 2010

My Favorite Roast Chicken


When I roast chicken I generally roast 2 or 3 at a time.  Roast chicken meat is just a good thing to have on hand; you can put it in soups or pasta or fried rice.  You can chop it up for tacos, or slice it for sandwiches.  You might as well just go ahead and go ahead.


I like to buy my chickens at a Mexican Grocery in our neighborhood.  The nice butchers in this store take the chickens out of the wet stuff and clean them up some, and then put them on clean, dry styrofoam plates.  Isn't that nice? So I always get them there  unless I'm in Mexico and then I just like them to be put whole into a plastic bag, knowing that the chickens I buy down there were walking around the day before! OMG, the flavor of those chickens!!!  However, lacking that, I like them ready-to-roast.  Also, at this little store, the chickens are small and young, not big ol' pig-birds.  I like them little and not covered with 2lbs. of fat.
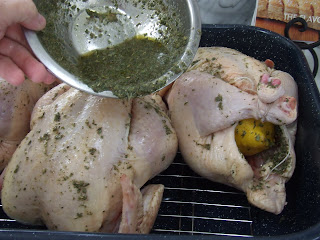
I take those little chickens and put a lemon (or a tangerine, orange, apple or onion) in them, but first I stab the lemon several times so the juices cook out.  Then I roll the lemon in herbs and salt; sometimes different ones, parsley, thyme, tarragon or sage.  My herb garden is pretty puny at the moment so I used something I buy called Garlic with Herbs, also dried parsley and poultry seasoning.  Stuff the lemon where the sun don't shine and then tie up their little legs.  This is where I keep my twine.  Thanks, Martha.
Use the bowl with the herbs and salt that you dipped your lemons in, and add olive oil, lemon juice, and honey or agave syrup, or even maple syrup.  About equal amounts of each.  Mix that well, then paint up the birds, top and bottom.

Put your chickens on a rack in a large roasting pan.   Add water to the left-over herb mixture, and pour it in the bottom of the pan.  Ooooh, this is going to smell so good!

Into an oven set to 375 for 45 minutes, then take them out and turn the birds over.  Cook for another 45 minutes. Yes, it's a pain.  Just do it.  The sugar in the sauce will make the birds brown really well, if you don't do this you'll end up with two-tone gallinas, not very pretty.

When your birds are cooked, take them out and let them cool, then remove the lemons and cut the chickens in pieces for serving.  I have a special carbon steel knife for this, Left Brain has to leave the kitchen because it makes him muy nervioso.